Yutong & Orange


  • Home

  • Archives

CSS - Grid

Posted on 2018-08-25

The overall introduction of CSS Grid layout, and a simple practice.

Screenshots

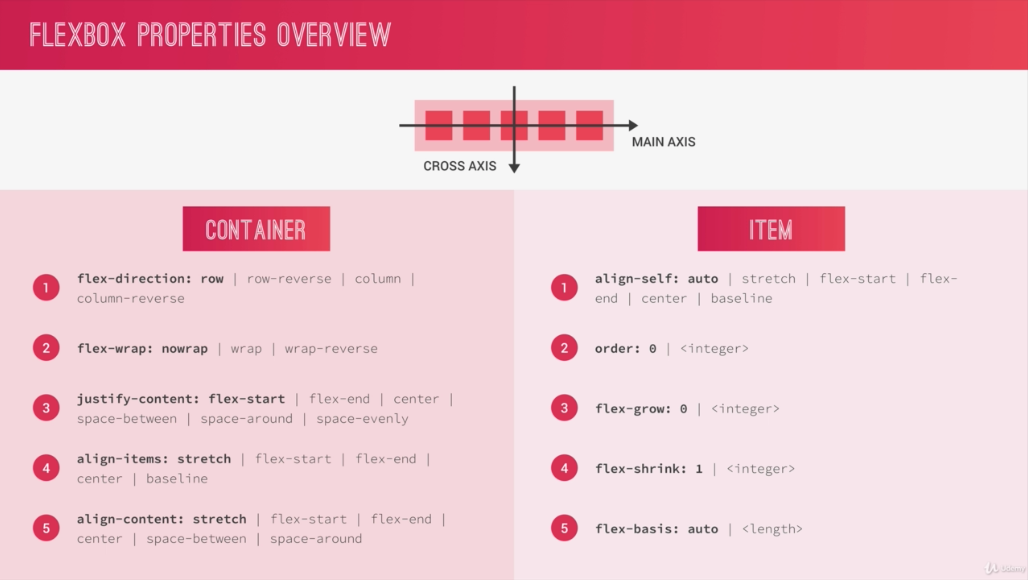
CSS Grid system is exactly functioning like its name’s declining. It separates the web page into grids on different rows and columns, then specifies a series of properties which can be used to put and style the items in the grids. Each row and column has its own number (starting from 1), which can be inspected from Firfox dev tool.

Here is a example for how to use the grid layout to create a nice page link.

Screenshots

First create the layout using html. If use Emmet, the comment can be .container>.grid*8, then specify each class and text inside.

1
2
3
4
5
6
7
8
9
<div class="container">
<div class="grid header">Header</div>
<div class="grid box">Small box 1</div>
<div class="grid box">Small box 2</div>
<div class="grid box">Small box 3</div>
<div class="grid sidebar">Sidebar</div>
<div class="grid main">Main content</div>
<div class="grid footer">Footer</div>
</div>

First specify the layout for the container as grid. Then use grid-template-rows and grid-template-columns to specify the number of rows and columns in the layout. grid-gap defines the gap between rows and columns. The unit fr here means one unit from the rest space.

1
2
3
4
5
6
.container {
display: grid;
grid-template-rows: 100px 200px 1fr 100px;
grid-template-columns: repeat(3, 1fr) 200px;
grid-gap: 20px;
}

Then we can put elements onto the layout using 3 different ways.

  1. Basic
    1
    2
    3
    4
    5
    6
    7
    8
    9
    10
    11
    12
    13
    14
    15
    .header {
    grid-row: 1 / 2;
    grid-column: 1 / -1;
    }
    .sidebar {
    grid-row: 2 / span 2;
    grid-column: 4 / -1;
    }
    .main {
    grid-row: 3 / 4;
    grid-column: 1 / 4;
    }
    .footer {
    grid-area: 4 / 1 / 5 / 5;
    }

grid-row is used to specify the start / end of the rows the item takes. Similar as grid-column property which is for columns. span here means how many grid it spans from the start. -1 means go till the end. grid-area, the value is in order: row-start / column-start / row-end / column-end.

  1. Naming Lines
    1
    2
    3
    4
    5
    6
    7
    8
    9
    10
    11
    12
    13
    14
    15
    16
    17
    18
    19
    20
    21
    22
    .container {
    display: grid;
    grid-template-rows: [header-start] 100px [header-end box-start] 200px [box-end main-start] 1fr [main-end footer-start] 100px [footer-end];
    grid-template-columns: repeat(3, [col-start] 1fr [col-end]) 200px [grid-end];
    grid-gap: 20px;
    }
    .header {
    grid-row: header-start / header-end;
    grid-column: col-start 1 / grid-end;
    }
    .sidebar {
    grid-row: header-end / main-end;
    grid-column: col-end 3 / grid-end;
    }
    .main {
    grid-row: box-end / main-end;
    grid-column: col-start 1 / col-end 3;
    }
    .footer {
    grid-row: footer-start / footer-end;
    grid-column: col-start 1 / -1;
    }

First in the container, specify the name of each line on the rows and columns, then in the items we can use those names when we define row and column start and end position.

  1. Naming Area
    1
    2
    3
    4
    5
    6
    7
    8
    9
    10
    11
    12
    13
    14
    15
    16
    17
    18
    19
    20
    21
    22
    23
    .container {
    display: grid;
    grid-template-rows: 100px 200px 1fr 100px;
    grid-template-columns: repeat(3, 1fr) 200px;
    grid-template-areas: "header header header header"
    "box1 box2 box3 side"
    "main main main side"
    "footer footer footer footer";
    grid-gap: 20px;
    }
    .header {
    grid-area: header;
    }

    .sidebar {
    grid-area: side;
    }
    .main {
    grid-area: main;
    }
    .footer {
    grid-area: footer;
    }

First give each grid in the area a name, it can be duplicated or empty (. means empty). Then we can use grid-area to specify the name for each item, the system will be able to put the item has the name same as the grid name to the area.

CSS - Flexbox (Trillo Project)

Posted on 2018-08-21

Today’s notes is for the Section 7, Lecture 72-88 of this udemy course.

Trillo Project

The project is a assignment / course content for the Udemy course. It fully implements the flexbox layout into everywhere of this webpage, meanwhile introduces some modern and cool CSS effects. The notes taken will focus more on the tricks used while building the project.

Screenshots

Use SVG library

Use SVG other than img can be benefitial in a lot of ways, it’s a more safe way to have image showing independentally from the network access, the file has to be load is much lighter, the icon / shape itself can be much more flexibly styled.

First, select the icons from icomoon website, or upload your artworks. Then choose download SVG to get the zip file.

Screenshots

Then get the symbol-defs.svg file in the folder, which can be used as the library contains all the icons downloaded. In the code directly use:

1
2
3
<svg>
<use xlink:href="img/symbol-defs.svg#icon-magnifying-glass"></use>
</svg>

The name(like icon-magnifying-glass) for each icon you selected can be looked up in the demo html file included in the folder as well.

Navbar on top

1
2
3
4
5
6
7
8
9
10
11
12
13
14
15
16
17
18
19
20
21
22
23
24
25
26
27
28
29
<header class="header">
<img src="img/logo.png" alt="Trillo Logo" class="logo">
<form action="#" class="search">
<input type="text" class="search__input" placeholder="Search hotels">
<button class="search__button">
<svg class="search__icon">
<use xlink:href="img/sprite.svg#icon-magnifying-glass"></use>
</svg>
</button>
</form>
<nav class="user-nav">
<div class="user-nav__icon-box">
<svg class="user-nav__icon">
<use xlink:href="img/sprite.svg#icon-bookmark"></use>
</svg>
<span class="user-nav__notification">7</span>
</div>
<div class="user-nav__icon-box">
<svg class="user-nav__icon">
<use xlink:href="img/sprite.svg#icon-chat"></use>
</svg>
<span class="user-nav__notification">13</span>
</div>
<div class="user-nav__user">
<img src="img/user.jpg" alt="User photo" class="user-nav__user-photo">
<span class="user-nav__user-name">Yutong</span>
</div>
</nav>
</header>
  1. Use flex box to place the three different parts.

    1
    2
    3
    4
    5
    6
    7
    .header {
    ...
    display: flex;
    justify-content: space-between;
    align-items: center;
    ...
    }
  2. Assign a fixed percentage to the search bar, the other parts will figure themselves out.

    1
    2
    3
    4
    5
    .search {
    ...
    flex: 0 0 40%; // no grow when space available, no shrink when space not enough, use 40% of the width (because flex-direction is set to 'row')
    ...
    }
  3. Can even use flexbox just for vertically and horizontally center align items.

    1
    2
    3
    4
    5
    6
    7
    8
    9
    10
    .user-nav {
    ...
    &__notification {
    ...
    display: flex;
    justify-content: center;
    align-items: center;
    }
    ...
    }
  4. Use align-self to specify the starting point for alignment for the element.

    1
    2
    3
    4
    .user-nav {
    align-self: stretch; // take the whole space on the y axis (the cross axis)
    ...
    }

Sidebar

1
2
3
4
5
6
7
8
9
10
11
12
13
<nav class="sidebar">
<ul class="side-nav">
<li class="side-nav__item side-nav__item--active">
<a href="#" class="side-nav__link">
<svg class="side-nav__icon">
<use xlink:href="img/sprite.svg#icon-home"></use>
</svg>
<span>Hotel</span>
</a>
</li>
</ul>
...
</nav>

Of course the sidebar also use flexbox to align links and icons, more want to highlight the animation for hovering here. The logic behind is to have the ::before class for the icon, when hover, change the Y axis first, then the width.

1
2
3
4
5
6
7
8
9
10
11
12
13
14
15
16
17
18
19
20
21
22
.side-nav {
...
&__item::before {
content: "";
position: absolute;
top: 0;
left: 0;
height: 100%;
width: 3px;
background-color: var(--color-primary);
transform: scaleY(0); // have to specify it here to mark the normal state for animation to work.
transition: transform .2s,
width .4s cubic-bezier(1,0,0,1) .2s,
background-color .1s;
}
&__item:hover::before,
&__item--active::before {
transform: scaleY(1);
width: 100%;
}
...
}

Overview

1
2
3
4
5
6
7
8
9
10
11
12
13
14
<div class="overview">
<h1 class="overview__heading">
...
</h1>
<div class="overview__stars">
...
</div>
<div class="overview__location">
...
</div>
<div class="overview__rating">
...
</div>
</div>

Other than specify the percentage of the element to control the layout, sometimes can simply use margin: auto to place the empty space somewhere to layout the elments neatly.

1
2
3
4
5
6
7
8
.overview {
display: flex;
align-items: center;
...
&__stars {
margin-right: auto; // all the empty space will be taken on the right side of this section
}
}

Details

1
2
3
4
5
6
7
8
9
10
11
12
13
14
15
16
17
18
19
20
21
22
23
24
25
26
27
28
29
30
31
32
<div class="detail">
<div class="description">
...
<ul class="list">
<li class="list__item">Close to the beach</li>
<li class="list__item">Breakfast included</li>
<li class="list__item">Free airport shuttle</li>
<li class="list__item">Free wifi in all rooms</li>
<li class="list__item">Air conditioning and heating</li>
<li class="list__item">Pets allowed</li>
<li class="list__item">We speak all languages</li>
<li class="list__item">Perfect for families</li>
</ul>
<div class="recommend">
...
<div class="recommend__friends">
<img src="img/user-3.jpg" alt="Friend 1" class="recommend__photo">
<img src="img/user-4.jpg" alt="Friend 2" class="recommend__photo">
<img src="img/user-5.jpg" alt="Friend 3" class="recommend__photo">
<img src="img/user-6.jpg" alt="Friend 4" class="recommend__photo">
</div>
</div>
</div>

<div class="user-reviews">
<figure class="review">
...
</figure>
...
<button class="btn-inline">Show all <span>&rarr;</span></button>
</div>
</div>
  1. Place the elements into two columns like table.
    Let each element take 50% of the width, then specify the flex-wrap to wrap the content.

    1
    2
    3
    4
    5
    6
    7
    8
    9
    10
    .list {
    ...
    display: flex;
    flex-wrap: wrap;

    &__item {
    flex: 0 0 50%;
    ...
    }
    }
  2. Change the color of SVG
    The logic is use it as a background mask of the color.

    1
    2
    3
    4
    5
    6
    7
    8
    9
    10
    11
    12
    13
    14
    15
    16
    17
    18
    19
    .list {
    &__item::before {
    ...

    //older browsers (without color change)
    background-image: url(../img/chevron-thin-right.svg);
    background-size: cover;

    @supports (-webkit-mask-image: url()) or (mask-image: url()) {
    //newer browsers
    background-color: var(--color-primary); // the background color
    -webkit-mask-image: url(../img/chevron-thin-right.svg);
    -webkit-mask-size: cover;
    mask-image: url(../img/chevron-thin-right.svg);
    mask-size: cover;
    background-image: none;
    }
    }
    }
  3. Place images on top of one another
    Have a border for each image, then margin each image using a negative value.

    1
    2
    3
    4
    5
    6
    7
    8
    9
    10
    11
    12
    13
    14
    15
    .recommend {
    ...
    &__photo {
    box-sizing: content-box;
    height: 4rem;
    width: 4rem;
    border-radius: 50%;
    border: 3px solid #fff;

    &:not(:last-child) {
    margin-right: -2rem;
    }
    }
    ...
    }
  4. Place a quote symbol on the left top of the div
    The point here is to use entity other than the actual ‘ “ ‘ as the content for the ::before class. Can look up the entity code here.

    1
    2
    3
    4
    5
    6
    7
    8
    9
    10
    11
    12
    13
    14
    .review {
    ...
    &::before {
    content: "\201C";
    position: absolute;
    left: -1rem;
    top: -2.75rem;
    font-size: 20rem;
    color: var(--color-grey-light-2);
    font-family: sans-serif;
    line-height: 1;
    z-index: 1;
    }
    }

CTA

1
2
3
4
5
6
7
8
9
<div class="cta">
<h2 class="cta__book-now">
Good news! We have 4 free rooms for your selected dates!
</h2>
<button class="btn">
<span class="btn__visible">Book now</span>
<span class="btn__invisible">Only 4 rooms left</span>
</button>
</div>

The button is the most fun here. Have both text ready to use, then change the Y axis position to replace one another with animation effect, use overflow to hide the other text outside of the button.

1
2
3
4
5
6
7
8
9
10
11
12
13
14
15
16
17
18
19
20
21
22
23
24
25
26
27
28
29
30
31
32
33
34
35
36
37
38
39
40
41
42
43
44
45
46
47
48
49
.btn {
font-size: 1.5rem;
font-weight: 300;
text-transform: uppercase;
border-radius: 100px;
border: none;
background-image: linear-gradient(to right, var(--color-primary-light), var(--color-primary-dark));
color: #fff;
position: relative;
overflow: hidden;
cursor: pointer;

& > * {
display: inline-block; // to be able to be assigned value for width and height
height: 100%;
width: 100%;
transition: all .2s;
}

&__visible {
padding: 2rem 7.5rem;
}

&__invisible {
position: absolute;
padding: 2rem 0;

left: 0;
top: -100%;
transition: all .2s;
}

&:hover {
background-image: linear-gradient(to left, var(--color-primary-light), var(--color-primary-dark)); // reverse the color gradient
}

&:hover &__visible {
transform: translateY(100%);
}

&:hover &__invisible {
top: 0;
}

&:focus {
outline: none;
animation: pulsate 1s infinite;
}
}

CSS - Flexbox

Posted on 2018-08-20

Today’s notes is for the Section 7, Lecture 67-71 of this udemy course.

Flexbox Introduction

Screenshots

Main Properties

Container properties

  1. flex-direction defines the axis on which the items should be aligned.
  2. flex-wrap defines how the container should align the items when the size of the items overflow the container.
  3. justify-content defines how the items should be aligned on the main axis.
  4. align-items defines how the items should be aligned on the cross axis.
  5. align-content defines how the lines should be aligned on the cross axis, when there are multiple lines on the cross axis.

Item properties

  1. align-self defines where to align the item itself based on the container.
  2. order defines the order of the item among all the sibilines.
  3. flex-grow defines the ratio of the space the item can take when there is extra space in the container.
  4. flex-shrink defines the ratio of the space the item can shrink when there’s not enough space in the container.
  5. flex-basis defines the initial size of the item before the available space being distributed.

CSS - Natour Part4

Posted on 2018-07-21

Today’s notes is for the Section 5, Lecture 49-53 of this udemy course.

Lecture 49-51

Screenshots

Create a menu button

1
2
3
4
5
6
<div class="navigation">
<input type="checkbox" id="navi-toggle" class="navigation__checkbox">
<label for="navi-toggle" class="navigation__button">
<span class="navigation__icon"></span>
</label>
</div>

Open button

The basic approach is to using a button-like element to perform as the toggle of the menu. Behind the scene, it uses the checkbox input as the event trigger.

1
2
3
4
5
6
7
8
9
10
11
12
13
14
15
16
17
18
19
20
21
22
23
24
25
26
27
28
29
30
31
32
33
34
35
36
37
38
39
40
41
42
43
44
45
46
47
48
49
50
.navigation {

&__checkbox {
display: none; // don't show the actual checkbox input
}

&__button {
position: fixed; // to set the button at fixed position of the screen. won't scroll with the page
width: 7rem;
height: 7rem;
top: 6rem;
left: 6rem;
border-radius: 50%;
cursor: pointer;
background-color: $color-white;
text-align: center;
z-index: 2000; // to place the button always on top of other things
box-shadow: 0 2rem 3rem rgba($color-black, .1); // x y blur color
}

&__icon {

position: relative; // to let the before and after be placed according to the icon itself
margin-top: 3.5rem;

&,
&::before,
&::after {
width: 4rem;
height: 2px;
backgroud-color: $color-grey-dark;
display: inline-block; // otherwise it will be inline element, can't be aligned properly.
} // get the shape of the rectangle

&::before,
&::after {
content: "";
position: absolute;
left: 0; // align to the left
}

&::before {
top: -0.8rem; // above the central one
}

&::after {
top: 0.8rem; // below the central one
}
}
}

Change open button into close button

The approach is to make the navigation__icon itself disappear, then rotate the before and after elements.

1
2
3
4
5
6
7
8
9
10
11
12
13
14
15
16
.navigation {

&__checkbox:checked + &__button &__icon {
background-color: transparent; // if use display:none or change the width / height, the before and after will be changed accordingly.
} // when the checkbox is checked, modify the &__icon element inside of the &__button sibline element

&__checkbox:checked + &__button &__icon::before {
top: 0;
transform: rotate(135deg);
}

&__checkbox:checked + &__button &__icon::before {
top: 0;
transform: rotate(-135deg);
}
}

Menu

1
2
3
4
5
6
7
8
9
10
<div class="navigation__background">&nbsp;</div>
<nav class="navigation__nav">
<ul class="navigation__list">
<li class="navigation__item"><a href="#" class="navigation__link"><span>01</span>About Natous</a></li>
<li class="navigation__item"><a href="#" class="navigation__link"><span>02</span>Your benefits</a></li>
<li class="navigation__item"><a href="#" class="navigation__link"><span>03</span>Popular tours</a></li>
<li class="navigation__item"><a href="#" class="navigation__link"><span>04</span>Stories</a></li>
<li class="navigation__item"><a href="#" class="navigation__link"><span>05</span>Book now</a></li>
</ul>
</nav>

Expand the background to the full screen

The background is initially a circle shage hiding behind the button, when the checkbox is checked which means the background should be expanded out, increase the size.

1
2
3
4
5
6
7
8
9
10
11
12
13
14
15
16
17
.navigation {
&__background {
position: fixed;
width: 6rem; // slightly smaller than the button
height: 6rem;
top: 6.5rem;
left: 6.5rem;
border-radius: 50%;
background-image: radial-gradient($color-primary-light, $color-primary-dark); // gradient from central point
z-index: 1000;
transition: transform .8s cubic-bezier(0.86, 0, 0.07, 1); // cubic-bezier function used for customized animation effect
}

&__checkbox:checked ~ &__background {
transform: scale(80); // enlarge the background to cover the full screen
}
}

Display the menu

Set the menu invisible when the checkbox unchecked.

1
2
3
4
5
6
7
8
9
10
11
12
13
14
15
16
17
18
19
20
21
22
23
24
25
26
27
28
29
.navigation {
&__nav {
height: 100vh;
position: absolute;
top: 0;
left: 0;
z-index: 1500; // under the button, above the background
transition: all .8s cubic-bezier(0.68,-0.55, 0.265, 1.55);
// initially set the nav to invisible
width: 0;
opacity: 0;
}

&__checkbox:checked ~ &__nav {
width: 100%;
opacity: 1;
}

&__list {
position: absolute;
// typical function to center align horizontally and vertically an element
left: 50%;
top: 50%;
transform: translate(-50%, -50%);
list-style: none;
text-align: center;
width: 100%;
}
}

List item styling

The hover background effect: Have a bigger background with half transparent and half width, with the sepration skewed. Then move the background from one side to another to create the effect of the white color moving in from the side when hovered.

1
2
3
4
5
6
7
8
9
10
11
12
13
14
15
16
17
18
19
20
21
22
23
24
25
26
27
28
29
30
31
32
33
34
35
36
.navigation {
&__item {
margin: 1rem;
}

&__link {
&:link,
&:visited {
display: inline-block;
font-size: 3rem;
font-weight: 300;
padding: 1rem 2rem;
color: $color-white;
text-decoration: none;
text-transform: uppercase;
background-image: linear-gradient(
120deg,
transparent 0%,
transparent 50%,
$color-white 50%
); // create the half transparent half white background
background-size: 230%; // to make it initially with only the transparent half, then move to white half
transition: all .4s ease;

span {
margin-right: 1.5rem;
}
}
&:hover,
&:active {
background-position: 100%; // move to the other end
color: $color-primary;
transform: translateX(1rem); // move to the right a little bit
}
}
}

Lecture 52-53

Screenshots

1
2
3
4
5
6
7
8
9
10
11
12
13
14
15
16
17
<div id="popup" class="popup">
<div class="popup__content">
<div class="popup__left">
<img src="img/nat-8.jpg" alt="Tour photo" class="popup__img">
<img src="img/nat-9.jpg" alt="Tour photo" class="popup__img">
</div>
<div class="popup__right">
<a href="#section-tours" class="popup__close">&times;</a>
<h2 class="heading-secondary u-margin-bottom-small">Start booking now</h2>
<h3 class="heading-tertiary u-margin-bottom-small">Important &ndash; Please read these terms before booking</h3>
<p class="popup__text">
Lorem ipsum dolor sit amet consectetur adipisicing elit. Lorem ipsum dolor sit amet consectetur adipisicing elit. Maxime neque libero harum ullam beatae recusandae vero reprehenderit voluptates perferendis nobis natus quibusdam saepe, magnam nihil voluptatem assumenda? Lorem ipsum dolor sit amet consectetur adipisicing elit. Lorem ipsum dolor sit amet consectetur.
</p>
<a href="#" class="btn btn--green">Book now</a>
</div>
</div>
</div>

Create the Pop up

The pop up should be at the fixed position on the screen, but won’t show up before been triggered.
Point layout: column for text, hyphen for word, left right sections with same height using display table-cell.

1
2
3
4
5
6
7
8
9
10
11
12
13
14
15
16
17
18
19
20
21
22
23
24
25
26
27
28
29
30
31
32
33
34
35
36
37
38
39
40
41
42
43
44
45
46
47
48
49
50
51
52
53
54
55
56
57
58
59
60
61
62
.popup {
background-color: rgba($color-black, .8);
width: 100%;
height: 100vh;
position: fixed;
top: 0;
left: 0;
z-index: 5000;
// hidden initially
opacity: 0;
visibility: hidden;
transition: all 0.3s;

&__content {
@include absCenter;
width: 75%;
// height: 50rem;
border-radius: 3px;
background-color: $color-white;
box-shadow: 0 2rem 4rem rgba($color-black, .2);
display: table; // for the table-cell display children elements
overflow: hidden;
opacity: 0;
transform: translate(-50%, -50%) scale(.5);
transition: all .5s .25s;
}

&__left {
width: 33.3333%;
display: table-cell;
vertical-align: middle; // works for table-cell display layout
}

&__right {
width: 66.6667%;
display: table-cell;
vertical-align: middle;
padding: 3rem 5rem;
}

&__img {
display: block;
width: 100%;
}

&__text {
font-size: 1.4rem;
margin-bottom: 4rem;

-moz-column-count: 2;
-moz-column-gap: 4rem;
-moz-column-rule: 1px solid $color-grey-light-2;
column-count: 2; // separate into 2 columns
column-gap: 4rem; // the gap between columns
column-rule: 1px solid $color-grey-light-2;

-moz-hyphens: auto;
-ms-hyphens: auto;
-webkit-hyphens: auto;
hyphens: auto;
}
}

Link the pop up to the button

Using link href to link to the specific element with the id.

1
<a href="#popup" class="btn btn--white">Book now!</a>

When the element itself is triggered by id, we can use the target psedo class to manipulate the css.

1
2
3
4
5
6
7
8
9
10
11
.popup {
&:target {
opacity: 1;
visibility: visible;
}

&:target &__content {
opacity: 1;
transform: translate(-50%, -50%) scale(1);
}
}

CSS - Natour Part3

Posted on 2018-07-18

Today’s notes is for the Section 5, Lecture 42-47 of this udemy course.

Lecture 42-44

Screenshots

How to create a circled picture

First we define how the element outside will align with the element. In this case, the text on the right hand side.

1
2
3
4
5
6
7
.story__shape {
float: left;
width: 5rem;
height: 5rem;
-webkit-shape-outside: circle(50% at 50% 50%); // diameter, circle center point
shape-outside: circle(50% at 50% 50%); //only work if the element is floating and have dimensions set.
}

Then we circle the element itself.

1
2
3
4
.story__shape {
-webkit-clip-path: circle(50% at 50% 50%);
clip-path: circle(50% at 50% 50%);
}

How to put a video at the background

1
2
3
4
5
6
7
<div class="bg-video">
<video class="bg-video__content" autoplay muted loop>
<source src="img/video.mp4" type="video/mp4">
<source src="img/video.webm" type="video/webm">
Your broswer is not supported!
</video>
</div>
1
2
3
4
5
6
7
8
9
10
11
12
13
14
15
16
.bg-video {
position: absolute;
top: 0;
left: 0;
height: 100%;
width: 100%;
z-index: -1;
opacity: .15;
overflow: hidden;

&__content {
height: 100%;
width: 100%;
object-fit: cover; // work as background-fit, but work for html element
}
}

Lecture 45-47

Screenshots

Another way of clipping the background image

We can achieve this by specifying two layer of background image with the first layer being a gradient. Then specify the angle and the transition of the gradient to create a skewed transparent layer on top of the image.

1
2
3
4
5
6
7
8
9
10
11
12
13
14
15
16
17
.book {
background-image: linear-gradient(
105deg,
rgba($color-white, .9) 0%,
rgba($color-white, .9) 50%,
transparent 50%)
,url(../img/nat-10.jpg); // angle, color potiion, color position, color position.
background-size: cover;
border-radius: 3px;
box-shadow: 0 1.5rem 4rem rgba($color-black, .2);
height: 50rem;

&__form {
width: 50%;
padding: 6rem;
} // place the form at the left side
}

Customize radio button input

1
2
3
4
5
6
7
<div class="form__radio-group">
<input id="small" type="radio" class="form__radio-input" name="size">
<label for="small" class="form__radio-label">
<span class="form__radio-button"></span>
Small tour group
</label>
</div>

Create radio btn using span

1
2
3
4
5
6
7
8
9
10
&__radio-button {
height: 3rem;
width: 3rem;
border: 5px solid $color-primary;
border-radius: 50%;
display: inline-block;
position: absolute;
left: 0;
top: -0.4rem;
}

Create the selected effect

1
2
3
4
5
6
7
8
9
10
11
12
13
14
15
16
&__radio-button {
&::after {
height: 1.3rem;
width: 1.3rem;
content: "";
display: block;
border-radius: 50%;
position: absolute;
top: 50%;
left: 50%;
transform: translate(-50%, -50%);
background-color: $color-primary;
opacity: 0; // set to transparent by default
transition: opacity .2s;
}
}

Connect to the real input

1
2
3
&__radio-input:checked ~ &__radio-label &__radio-button::after {
opacity: 1;
} // when the radio-input is checked, the radio-button inside the sibline radio-label, it's after class got showed.

Hide the real input

1
2
3
&__radio-input {
display: none;
}

CSS - Natour Part2

Posted on 2018-07-16

Today’s notes is for the Section 5, Lecture 39-41 of this udemy course.

Screenshots

How to have a flipping card

1
2
3
4
5
6
7
8
<div class="card">
<div class="card__side card__side--front">
...
</div>
<div class="card__side card__side--back">
...
</div>
</div>
1
2
3
4
5
6
7
8
9
10
11
12
13
14
15
16
17
18
19
20
21
22
23
24
25
26
27
28
29
.card {
position: relative;
height: 52rem;
perspective: 1500rem; // for control the rotate angle, the bigger the smoother

&__side {
position: absolute; // to make the two div positioned at the same place
top: 0;
left: 0;
width: 100%;
height: 100%;
transition: all .8s ease;
border-radius: 3px;
overflow: hidden; // to keep the border radius no matter the shape of child elements
backface-visibility: hidden; // to hide the element when rotated to the back

&--back {
transform: rotateY(180deg); // set the back div initially to be rotated back
}


}
&:hover &__side--front {
transform: rotateY(-180deg); // when hover, rotate the front div to the back
}
&:hover &__side--back {
transform: rotateY(0); // when hover, rotate the back div to the front
}
}

How to clip & blend the background image

Clip background image

1
2
3
4
.card__picture {
-webkit-clip-path: polygon(0 0, 100% 0, 100% 85%, 0 100%);
clip-path: polygon(0 0, 100% 0, 100% 85%, 0 100%); // clip the thing, params as left top, right top, right bottom, left bottom
}

Blend background image

1
2
3
.card__picture {
background-blend-mode: screen; // only supported in certain browsers, IE not included
}

How to set the decoration for span break

When an inline element got broke into several different lines, how to keep the decoration consistent for all the lines? For example padding distance.

1
2
3
4
.card__heading--span {
-webkit-box-decoration-break: clone; // keep it consistent
box-decoration-break: clone;
}

CSS - Natour Part1

Posted on 2018-07-15

This series of articles are the daily study notes related to tech. It can be coding related, for CSS, JS, etc. Or design related like Photoshop, etc.Today’s notes is for the Section 5, Lecture 38 of this udemy course.

Screenshots

How to have a layer gradient over background image

1
2
3
4
5
6
7
8
9
.background {
background-image: linear-gradient (
to right bottom,
rgba($color1, 0.8),
rgba($color2, 0.8),
url(../img/img.png)
);
background-size: cover;
}

How to skew background image

Skew the background

1
2
3
.parent-element {
transform: skewY(-7deg);
}

Keep the child elements straight

1
2
3
.parent-element > * {
transform: skewY(7deg);
}

How to give text gradient effect

1
2
3
4
5
6
7
8
9
10
.text {
background-image: linear-gradient (
to right,
rgba($color1, 0.8),
rgba($color2, 0.8)
);
background-clip: text;
-webkit-background-clip: text;
color: transparent;
}

《JavaScript高级程序设计》第六章笔记

Posted on 2018-01-30

介绍

这一章主要讲的是在JS中的对于面向对象这一概念是如何实现的。讲到的主要内容有,对象,创建对象,和继承。

对象(Object)

属性类型

  1. 数据属性(Data Properties)
    包括一个数据值
    -
  2. 访问器属性(Accessor Properties):包括getter和setter的pair。

继承(Inheritance)

基本概念

  1. JavaScript只有对象,没有类和接口的概念
  2. 函数也是一种对象。对象的特点:原型,构造器
  3. 构造函数:当调用一个方法的时候,我们使用了new关键字,便说明该函数将被当做构造函数来使用
  4. 所有对象都继承自Object这个对象。

    原型链继承

    实例[内部指针] -> 构造函数[原型对象]
    1
    2
    3
    4
    5
    6
    7
    8
    9
    10
    11
    function SuperType() {
    this.property = true;
    this.function = function() {
    return "function supertype";
    }
    }
    function SubType() {}
    SubType.prototype = new SuperType();
    var instance = new SubType();
    var property = instance.property //true
    var value = instance.function; //"function"

缺点

原型的方法和属性会被子类所有的instance共享。

构造函数继承

1
2
3
4
5
6
function SuperType(name) {
this.name = name;
}
function SubType(name) {
SuperType.call(this, name);
}

《JavaScript高级程序设计》第五章笔记

Posted on 2018-01-28

介绍

这一章主要讲JavaScript里面的引用类型。JavaScript没有类(Class)和接口(Interface)这类的概念,所谓的引用类型,可以说是集合数据和方法的结构体。所有的对象,都是引用类型的实例。

对象类型(Object Type)

两种定义方法

1
2
3
4
5
6
7
8
9
//1
var person = new Object();
person.name = "Yutong";
person.age = 24;
//2
var person = {
name: "Yutong",
age: 24
};

两种get属性的方法

1
2
alert(person.name);
alert(person["name"]);

当属性名中有空格,或者别的会导致解析错误的,或者保留字关键字时,只能用第二种方法来access属性。

数组类型(Array Type)

两种定义方法

1
2
3
4
5
6
//1
var colors = new Array();
var colors = new Array(20);
var colors = new Array("red", "blue", "green");
//2
var colors = ["red", "blue", "green"];

数组的一些方法

栈方法(Stack Methods)

  1. push(),在数组末尾添加元素。
  2. pop(),在数组末尾移除元素。
    1
    2
    colors.push("yellow", "orange");
    colors.pop(); //"orange"

队列方法(Queue Methods)

  1. shift(),在数组头部移除元素。
  2. unshift(),和push()相同,在数组末尾添加元素。
    1
    colors.shift(); //"red"

重排序方法(Reordering Methods)

  1. reverse()方法,将数组中的元素倒序。
  2. sort()方法,将元素按照特定方式进行排序。默认的方法是通过对比字符串的方式。sort可以接受一个方法参数,定义排序的逻辑。
    1
    2
    3
    4
    5
    6
    7
    8
    9
    10
    11
    var arr = [1, 5, 3, 15, 13];
    arr.sort(); //[1, 13, 15, 3, 5];
    arr.sort(function(v1, v2) {
    if (v1 < v2) {
    return 1;
    } else if (v1 > v2) {
    return -1;
    } else {
    return 0;
    }
    }); //[1, 3, 5, 13, 15]

操作方法(Manipulation Methods)

一些特性

  1. 一个数组可以同时包含不同类型的元素。
  2. 如果用index来取数组中的元素,index大于数组的长度,将会自动调整数组的长度到index在的长度。没有定义过的元素值是undefined。
    1
    2
    3
    var arr = new Array(3);
    arr[5] = 1;
    alert(arr.length); //6

《JavaScript高级程序设计》第四章笔记

Posted on 2018-01-20

介绍

本章主要介绍了JavaScript的变量,作用域以及内存问题。

变量

ECMAScript中定义了两种变量,基本类型和引用类型。基本类型存在栈(Stack)中,引用类型存在(Heap)中。

动态的属性

引用类型可以有属性,基本类型不可以。

复制变量值

  • 基本类型是值的复制,将一个变量的值赋给另一个变量时num1 = num2;,实际上是将num2中的值复制一份出来,再赋给num1。
  • 引用类型也是值的复制。先从,实际上存储对象的变量中的“值”是什么开始解释。虽然对象本身在内存中存在堆里,但是指向对象的变量却不是。变量存在栈里,而存在栈里的值,即是在堆中存储的对象的地址。之后就比较好理解,所谓的“值传递”,在对象这个情况中,就指的是将对象的地址复制一份,传给另一个变量。obj1 = obj2;做的事情是,让obj1和obj2同时指向了同一个对象。那么当对象的属性或者方法改变的时候,将同时反映到obj1和obj2中。

    传递参数

    ECMAScript中的函数传递参数只有值传递,没有地址传递。这一部分感觉在碰到传递对象为参数的时候很难理解。先举两个例子。
    示例一:
    1
    2
    3
    4
    5
    6
    function giveName(obj) {
    obj.name="Yutong";
    }
    var person = new Object();
    giveName(person);
    alert(person.name); // Yutong

示例二:

1
2
3
4
5
6
7
8
function giveName(obj) {
obj.name="Yutong";
obj = new Object();
obj.name = "Huang";
}
var person = new Object();
giveName(person);
alert(person.name); // Yutong

可以看出示例一中,person对象的属性被修改了,很容易被理解为是引用传递。但是其实是值传递。因为在函数内部的obj得到了一份person这个变量所指向的那个对象的地址。此时obj和person指向的是同一个变量。因为修改obj属性时,就修改了person的属性。
但是实例二中为什么就不成立了呢?
代码运行到obj = new Object();这一步的时候,做的事情不是将obj所指向的对象重新初始化,而是把obj指向了另一个别的对象,这个对象是新初始化的一个Object对象。因此之后对obj的操作,将于person指向的对象没有关联。

Nicholas老实说,Think of function arguments in ECMAScript as nothing more than local variables. 我感觉还是需要再理解。

检测类型

  • typeof
    typeof可以检测Number,String,Boolean和Undefined,但是Null的值会被判断成Object。
  • instanceof
    用instanceof检测对象具体是不是一个类型的实例。

执行环境及作用域

  • 每个函数都有自己的执行环境。当被执行时,将自身的执行环境push到环境栈中,然后执行完毕时再从栈中pop出来。
  • 当代码再一个执行环境中执行的时候,会为变量对象创建一个作用域链,链的顶端是当前的执行环境中的变量对象。当代码中需要一个变量时,会从作用域链的顶端往下回溯,一直到找到了为止。
  • 延长作用域链
    通常只有全局和局部(函数),但是一下特殊的语句也可以将特定的对象添加到作用域链。
    • try - catch语句中的catch块,可以将抛出的错误对象添加到作用域链顶端。
    • with语句,可以把特定对象添加到作用域顶端。

垃圾收集

标记清除(mark-and-sweep)

  • 当变量进入执行环境时,进行标记1。
  • 当变量退出执行环境时,进行标记2。
  • 垃圾收集时,先将所有的变量都标记3,再把所有环境中的变量,以及环境中变量引用的变量清除标记3,然后把有标记3的变量清除。

引用计数

  • 跟踪变量被引用的次数。当引用次数变成0,即可回收。
  • 问题在于如果存在循环引用,obj1.name = obj2.name; obj2.age = obj1.age;在这种情况下,obj1和obj2的引用次数永远都是2,即永远不能再被清除。

管理内存

  • 解除变量的引用,可以帮助消除循环引用,并且让可回收的对象及时被回收。
12

Yutong Huang

17 posts
5 tags
© 2018 Yutong Huang
Powered by Hexo
|
Theme — NexT.Muse v5.1.3